Articles -> Blender: Dynamic Paint Guide

Blender: Dynamic Paint Guide

Creation date: 2010-10-7
Last update: 2010-12-1


Dynamic Paint is a new tool for Blender I've been working on. It allows you to "paint" animated textures with other objects and particles. This guide explains what all those settings are for.

If you are new to Dynamic Paint and don't know how to get started, you should read my Dynamic Paint Basics tutorial. It should help you to get started. This guide helps you to fully use this feature.

Dynamic Paint isn't currently part of official Blender, so you have to use a special build that has it. You can download a Windows build and code patch from MiikaHweb Blender Builds page. GraphicAll.org has some builds for other OS. Check out my blog for more info about Dynamic Paint.

Note: This article isn't currently up-to-date with latest development. Some features may differ or be missing.

Tutorial contents

1. Canvas: Main Settings
2. Canvas: Output Types
3. Canvas: Advanced Settings
4. Paint: Main Settings
5. Paint: Advanced Settings
6. Info and Samples

1. Canvas: Main Settings

 Resolution and Antialiasing

"Resolution" defines outputted texture dimensions. For example using 256 will lead to 256x256 image output. Doubling the resolution will likely quadruple baking time and vice versa.

 No anti-aliasing vs. Anti-aliasing

"Antialiasing" does smoothen paint edges using a 5x multisampling method. It will also slightly increase baking time.

Number of substeps

"Substeps" are extra frames calculated between "real" frames. This helps getting a smooth paint flow on fast moving objects, but also directly multiplies baking time.

For example if you set one substep, Dynamic Paint will calculate one extra sample between each frame, calculating following frames : 1.0, 1.5, 2.0, 2.5 etc. But only saves whole frames.

This video shows a paint map of a fast moving object without substeps: And now with 5 substeps:

Frame "Begin" and "End" values can be used to define baking start and end frames. Select a range of frames

"Bake Dynamic Paint" starts the baking process. Canvas must be UV-unwrapped and scene must have at least one active paint object. You can see bake process at console window and on mouse cursor. Pressing ESC will stop the bake.
Baking Dynamic Paint

2. Canvas: Output Types

Dynamic Paint system can output three different texture types: paint maps, wetmaps and displacement maps.

Paint map

Paint map is the "color texture". It shows paint color and alpha.

"Premultiply Alpha" makes color values to be multiplied by alpha while saving the texture. This is usually recommended to be turned on.

This video shows how paint map looks like:

When added as a texture to the canvas object: you get paint colors.
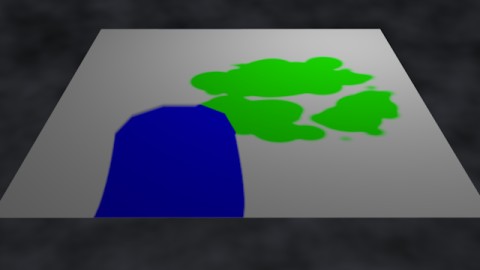
 Paintmap render

Texture influence settings used in that render:
 Paint map texture settings

Wetmap

Wetmap is a black-and-white texture that visualizes paint wetness. White being maximum wetness, black being completely dry. Paint dries within defined time period. Some "paint effects" affect wet paint only.

Basically wetmap equals to a paint map of white paint with fading enabled. It is a separate output because you usually want to use both paint map and wetmap simultaneously.

This video shows a wetmap:

If you set wetmap to influence normal, specular and ray mirror, render should look something like this:
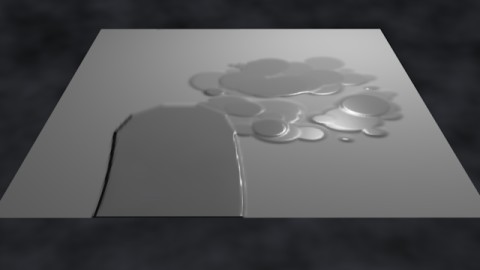
 Wetmap render

An example of wetmap influence settings:
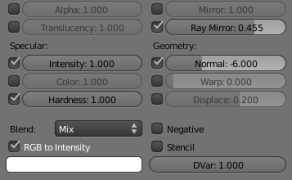
 Wetmap texture settings

If you use both paint map and wetmap, you can easily get a nice looking paint surface. You can also use any output texture as a mask for Blender's procedural textures etc. So keep playing with different combinations and you can get any kind of results.
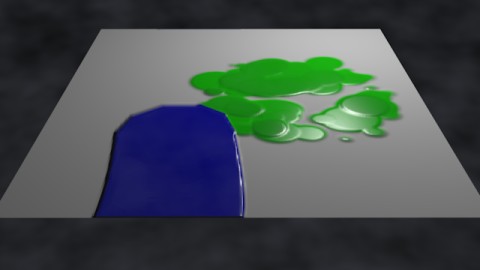
 Wetmap + paint map texture render

Displacement map

Displacement map is a texture supposed to be used with "Displace" modifier or with texture displace. It is sort of depth map visualizing distance (or depth) of paint object intersection.

"Strength" value defines how deep intersection is considered as maximum displacement. Use same value on displace modifier strength or on texture displace "scale" value.

"Type" drop-box defines output texture type: "Displace" is the standard type used by Blender, it's directly compatible with Blender displace tools.

You can also choose output file format between PNG and OpenEXR. OpenEXR is a 32-bit per channel floating point texture, so displace result is likely be smoother when using it. You need, however, a build that supports OpenEXR.

This is an example of a dispalce texture:

And this is how it looks like when used to displace a mesh. Remember that you have to subdivide the mesh before you can displace it:
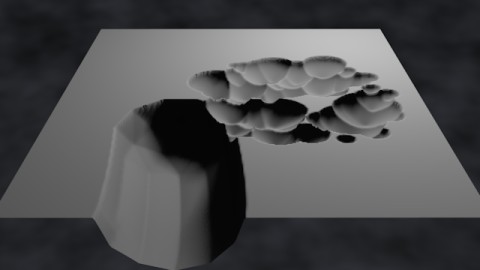
 Displace render

These texture influence and displace map output settings were used in the previous render:
 Displace texture settings  Displace output settings

Please note that enabling more output types doesn't cause a noticeable increase in bake times. So there is no need to disable texture outputs in terms of saving in bake times.

3. Canvas: Advanced Settings
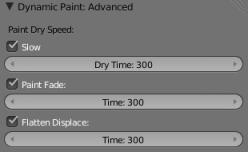
 Drying, fading and flattening paint

First three sliders let you to define paint drying, fading and flattening behavior. "Time" value defines number of frames it takes to revert from maximum value to zero. "Slow" drying enables logarithmic drying. Basically it makes high wetness to dry faster than low wetness.

Enabling "Paint Fade", makes paint to fade or disappear during time. "Flatten Displace" makes displace map to flatten back to zero depth during time.

"UV Layer" can be used to define the used UV-layer. If not defined or if mesh only has one layer, the active one is used.  UV layer selection

Paint Effects

"Paint Effects" is a Dynamic Paint sub-tool that generates animated movement on canvas surface.

In the "Effect" drop-box you can select different effects. This menu only defines which effect related settings are visible. To enable an effect, click the "Do Effect" checkbox below. You can also tweak effect speed from the value below.  Spreading effect

"Spreading" makes wet paint to spread on mesh surface. Only wet paint moves, so as the paint dries, it's movement slows down and eventually stops.

This is how spreading effect looks like:

"Dripping" is similar to spreading effect, but only moves paint in gravity direction.

This is how dripping effect looks like:

"Shrinking" makes paint to disappear from edges, eventually completely vanishing.

This is how shrinking effect looks like:

In case you are wondering why eyes behave differently, that's because they actually aren't connected to the head mesh. :p

Effect system is far from perfect, but it works well enough for most scenarios. You should try to unwrap UVs to as large pieces as possible and have at least two pixel space between each UV island. If you still experience strange behavior near UV island edges, try to use higher canvas resolution.

4. Paint: Main Settings

"Affect Paint" checkbox defines whether that paint object affects paint or wetmaps.

 Color and alpha settings

Paint Color selection box allows you to select color this object paints on color map.

Paint Alpha is the transparency of the paint. 1.0 means completely solid, while 0.0 is invisible.

Paint Material

"Use object material" makes Dynamic Paint to use the paint object material instead. Material and all it's textures are included. Final color equals the shadeless render color of the object. "Paint Alpha" value is used to multiply the material alpha value so you can still manually adjust the paint final alpha. You can even use alpha values greater than 1.0 to amplify faint textures etc.

Material can be either "Surface" or "Volumetric" type. All texture types are supported, but only those texture "Mapping" settings that don't require a camera.

This is an example of textured painting:

Surface Material

When using surface type materials, paint color is defined by the material diffuse color and alpha by material alpha. Following texture mapping types are supported. Other mapping methods will be simply ignored.
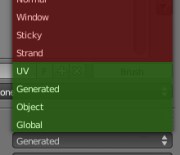
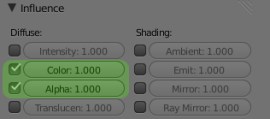
 Supported surface texture mapping  Surface texture influences that affect paint

Volumetric Material

In case of a volumetric material, paint color is sampled from the volume at the exact point of the canvas pixel. Material "Transmission color" is used as paint color and "Density" as paint alpha.
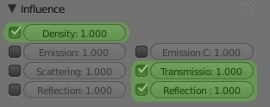
 Volumetric texture influences that affect paint

To paint with smoke, you just have to use the smoke domain as a paint object. Just remember that domain has to have a renderable volumetric material.
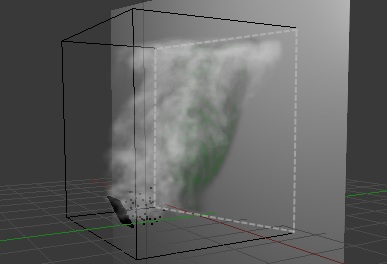
 Paint with smoke

Other settings

 Paint behavior

"Absolute Alpha" defines how transparent paint is handled. When enabled, texture alpha will never go higher than the defined "Paint Alpha". Without it however, texture alpha is increased every frame, eventually leading to completely solid paint surface.

"Wetness" defines how wet the paint is. Basically how it's shown on the wetmap. Wetness is multiplied by paint alpha, so you can use textured painting but only get wetness on actually painted areas.

"Erase Paint" setting inverts the way paint object behaves. Making it to remove paint instead of adding it. You can use paint alpha to define erase strength. High alpha leads to more paint being erased.

You can also use textures on eraser. Just remember that alpha is what matters, not color.

Here is a comparison between textured and non-textured eraser: First a plain one.

And now with a noise texture affecting material alpha. Please note that you need lots of substeps to get a smooth track.

"Affect Displace" defines whether this object affects displace texture.
 Paint affect displace

5. Paint: Advanced Settings

From the "Paint Source" list you can select how paint mesh intersection is handled or whether to use particles instead.

 Paint source selection

Mesh Volume

This is the default behavior. It makes Dynamic Paint to use mesh volume as paint source. Basically every pixel inside the paint object mesh will be painted. Object mesh has to be closed and have proper normals.
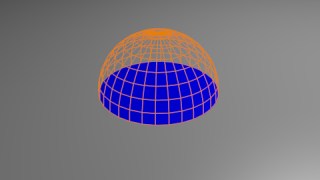
 Mesh volume painting. Only pixels inside the paint mesh will be painted.
Mesh volume painting. Only pixels inside the paint mesh will be painted.

Mesh Proximity

 Proximity Painting

Mesh Proximity is used to paint with a distance to the mesh surface. You can define distance to paint with using the "Paint Distance" settings. This is the maximum distance to mesh surface to affect paint.
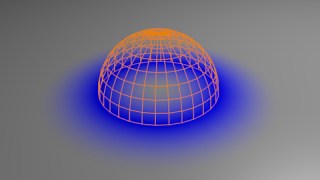
 Proximity painting. Only pixels withing the defined distance to the paint mesh surface are painted. Notice how some areas inside the mesh are unaffected by the paint.
Proximity painting. Only pixels withing the defined distance to the paint mesh surface are painted. Notice how some areas inside the mesh are unaffected by the paint.

From the "Falloff" drop-box you can change proximity falloff type.

  • "Sharp" paints solid paint within the defined distance.
  • "Smooth" makes paint to linearly fade out until becoming completely invisible when it reaches the maximum distance.
  • "Color Ramp" allows you to manually make a custom falloff behavior.
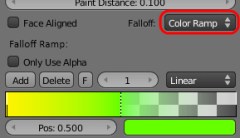
 Proximity color ramp

When using a color ramp falloff, the left side is color at right next to the paint object while right side is the maximum distance.

"Only Use Alpha" makes Dynamic Paint to only read color ramp alpha values. Then paint color remains unchanged.

This is an example of proximity painting. A following falloff color ramp is enabled to better illustrate the effect.  Color ramp that was used in the video below.

"Face Aligned" sets proximity painting to be processed only in the direction of canvas surface. This way only objects directly in front of the surface will be painted.
 Face Aligned Proximity Paint

Here is an example of face aligned proximity painting using the same color ramp:

Mesh Volume + Proximity

This option enables both volume and proximity checking. Everything inside the mesh volume is painted but also objects within defined distance to the mesh surface.
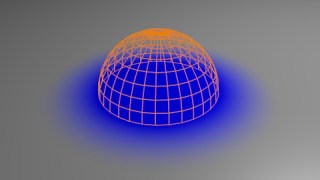
 Mesh volume+proximity painting.
Mesh volume+proximity painting.

This option can be useful for example when using Fluid simulation domain as a paint object. Fluid barely intersects the obstacles or domain walls so using low distance proximity painting is a good idea.

Particle System

This option lets you use a particle system as paint source.
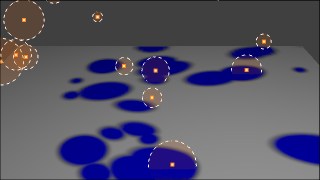
 Particle painting example

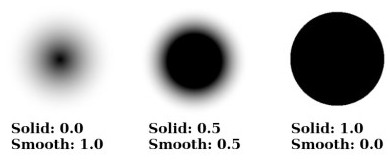
From the sliders you can adjust particle influence radius in global units. "Solid Radius" defines the distance, inside which paint is solid color. "Smooth Radius" is an additional radius outside Solid Radius to add a smooth falloff.
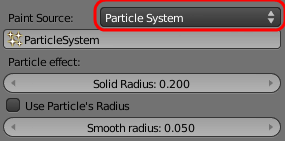
 Particle painting settings

If you set "Smooth Radius" to zero, particle will be painted as a solid sphere. If you set "Solid Radius" to zero, it gets painted as a smooth halo.
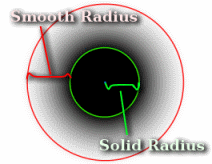
 Particle Radius Differences  Particle Radius Differences

6. Info and Samples

General notes

  • Like usually in Blender 2.5x, everything is animatable. This means you can freely animate Dynamic Paint settings. Every setting that accepts key frames can be freely animated to fit your purposes.
  • Canvas object and mesh can be freely animated - as long as the vertex count and uv data remains the same.
  • Paint object and mesh can be freely animated by all means. There are no limitations what-so-ever.

Downloadable samples

Here are some downloadable .blend file samples you can use to get started using Dynamic Paint. Please note that baking Dynamic Paint of these sample files may take a while on slower systems.

Paint and wetmaps rendering

This sample shows how to setup materials to render a nice looking paint material using both paint map and wetmap.
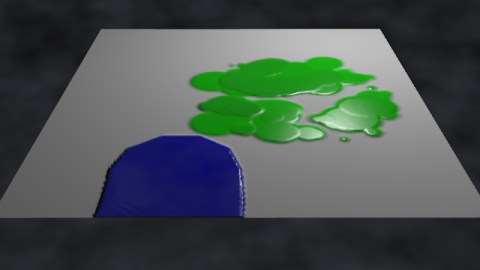
 Paint rendering example

Download the .BLEND file.

Displacement painting

This sample shows how to use Dynamic Paint to produce interactive displacement maps.
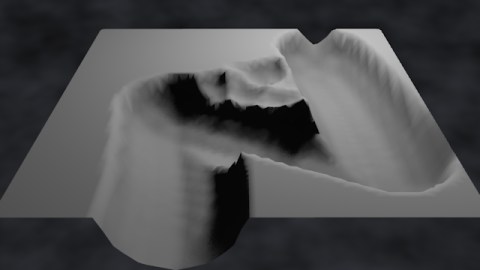
 Displacement painting

Download the .BLEND file.

Fluid simulation wetmaps

This sample shows how to use fluid simulation as a paint object to produce fluid wetmaps.

Download the .BLEND file.

Painting with smoke

This sample shows how to use smoke simulator domain as a volumetric paint object to paint with the smoke.
 Painting with smoke

Download the .BLEND file.


(Comments, questions or discussion about this article.)

Big Fan
Oct-10-2010 20:46
Thank you for work and now the guide.
I'll down load a build and give it a try. :)
lucky
Oct-11-2010 07:00
StarStarStarStarStar
Thank you! Great work!
grol
Oct-11-2010 07:44
Thanks!!

It seems really, really good!!!
woodn
Oct-11-2010 10:29
Oh WOW, thanks a lot for the nice guide. I'll try it out right now!
Demohero
Oct-11-2010 21:33
StarStarStarStarStar
Great guide Mikaa. Thank you!
rascen
Oct-12-2010 01:05
I dont know what else would you add , keep going! great job! THANKS!!!
hetors
Oct-12-2010 11:36
StarStarStarStarStar
Thanks Mikah for doing this complete guide!!
Tobias
Oct-12-2010 17:47
StarStarStarStarDark Star
Great work Miikah!! But I have a few suggestions for improvements.
1. Is it possible to make the effects as modifiers so that you can combine different effects to a final effect?
2. Wouldn't it be more logical to have dynamic paint at the same place as where you bake AO and such?
3. Allow more Anti-aliasing than 5x.
MiikaH
Oct-12-2010 18:10
@Tobias
1. You can already stack effects. Just enable "Do Effect" on multiple ones.
2. I have to look into that. I have never baked render stuff before. :p
3. I don't think that's worth the effort. After all it's just a texture. You barely notice whether AA is on or not. xP
SEspider
Oct-12-2010 22:05
StarStarStarStarStar
Thank you so much for the tutorial.
I got a request for myself and others.
Would it be possible to get a video tutorial of the above? That way we can watch it on TV/Xbox/Playstation and follow along? Many of us (myself included) have to see it to actually "get it."
belich
Oct-15-2010 23:47
Exelent work, hope that this project reach the blender trunk!
ZanQdo
Oct-18-2010 06:01
StarStarStarStarStar
this is fantastic work and great documentation! on a side note do you think the fantastic dynamic paint algorithm could be used as a way mightier dilate/erode node in the compositor? that would rock so much

cheers
m aka 47
Oct-19-2010 14:48
that is amazing and so easy to use u are the best
Brian L.
Oct-22-2010 05:07
StarStarStarStarStar
Amazawesome! Thanks for the good work, man!
ndee
Oct-22-2010 05:58
Hey Miikah,
thanks alot!! This is really an awsome feature! I am looking forward and hope this will get integrated soon in the main branch!
It would be great if every feature in blender will be so well documented!! Thanks again!
Keep it up! I am looking foward to your future work!
mastafrog
Oct-22-2010 10:48
StarStarStarStarStar
nice stuff,
how about this case: Drying liquid which is leaving traces with more
color on the beginning and to the end. Second, the wind thats moving
pixels where it can reach them and move less in the areas with for example are some cracks.

each thing simulating for few minutes in the loop. This should be really
interesting.
mastafrog
Oct-22-2010 10:53
StarStarStarStarStar
oh, and of cause for the liquid Spreading-Dripping-Shrinking simultaneously =D
sorry for spamming ;)
Delfeld
Oct-22-2010 13:55
StarStarStarStarDark Star
Very nice effects, and a straightforward tutorial. Thanks!
rednelb
Oct-23-2010 11:53
Thank you so much Miika!

It is the best way to show off a technology, concept!

MiikaH
Oct-24-2010 06:54
@blurdude

Either uncheck Color influence or click that "RGB To Intensity" box. Then color brightness will be used as texture affect strength.
blurdude
Oct-24-2010 08:03
@MiikaH

Thanks a lot for the help :D I really appreciate it.
Maybe you can improve ur tutorials by adding "DOs and DON'Ts". Overall its an awesome tutorial. :D
wraybowling
Oct-26-2010 15:12
StarStarStarStarStar
Niiiiiiice! The shrinking looks like a lot of fun :D
MiikaH
Nov-11-2010 05:51
@gimble

You mind posting a blend file where this happens? So I can check out what's going on there.
MiikaH
Nov-11-2010 14:42
@gimble

Ok, I'll check that out.

About that "trench slightly leading the sphere" issue: It was a bug in SVN version -> wrong default "start frame" for image sequences. It has been fixed in recent SVN.
How to fix that, just set sequence "Start" value to 1 instead of 0. :)
MiikaH
Nov-11-2010 20:55
@gimble

It was a quite special bug. If canvas had more than 32.767 vertices those "holes" started to emerge.

But now it's fixed: https://static.miikah.fi/blender/snowball.jpg

Thanks alot for reporting it! I will post an updated patch and builds tomorrow.
gimble
Nov-12-2010 04:06
Thanks MiikaH for the help and all your hard work.
Your latest demo looks really nice.
Tony
Nov-16-2010 21:55
I can't get the Mirror or alpha to work under influence ,with the wet maps. I clicked RGB to intensity ,changed settings all day.
MiikaH
Nov-16-2010 22:35
Remember to enable "Transparency" and "Mirror" from material settings. (You can just set material "Alpha" and "Reflectivity" to zero.)
tony
Nov-16-2010 23:16
Thanks, I just now got the mirror to work. I think this is the best tool I've seen in a time. I can think of so many uses.
Can a person use the spread with a texture without stepping? (I think that is the correct word) Re create the pattern evenly.?
Thanks again
Tony
Nov-17-2010 05:04
Oh I got that to . put alpha over a texture and remove it with spread paint.
Ejnaren
Dec-01-2010 08:57
StarStarStarStarStar
I love this work.
It can be used for so many cool things! More things than it was even intended to be used for because it has so many options...!
Simply Brilliant.
kilikoro
Dec-01-2010 13:47
Hello Mikah, Awesome work, that's really great.
Can you please upload the blendfile of the Mesh Volume + Proximity example. The one with the fluid on the stone. I'd like to study it, thanks
blazraidr
Dec-03-2010 12:05
StarStarStarStarStar
umm, when i use openexr for a displacement map, it comes out darker then the if i use png, and it doesnt work with openexr format properly. works fine with png but.
MiikaH
Dec-03-2010 12:47
@blazraidr:
What version and OS you're using?

I fixed that kind of bug months ago. Just tested with latest SVN on Windows 32/64-bit and it works fine.

So either you are using a very old version of Dynamic Paint or it's something OS related. :p
blazraidr
Dec-03-2010 14:13
StarStarStarStarStar
oh yes, my rev is 32013, an old version i guess. I'll try the latest rev, though its probably my fault for using an old build.
Big Fan
Dec-03-2010 20:35
Thanks very much for all 'Dynamic Paint' features and also for the Guide. I appreciate it must have been quite a bit of work. Hope to see this in Blender and the Wiki soon. :)
Jen
Dec-15-2010 15:01
This is amazing, you are very talented and generous. Thank you so much for sharing this with us.
Resh
Jan-03-2011 00:51
hi, how come I can't see everything that's in the advanced settings?

I use blender 2.6 build from your site and windows 7 64bit.
Resh
Jan-03-2011 00:55
nevermind, I was looking at the wrong menu


PS: Wohoo! first post of 2011
english bob
Feb-03-2011 14:36
would it be possible for you to post the .blend for the rain simulation.
think your work is fantastic by the way keep it up.
thanks
Miikah.
Thomas
Feb-04-2011 07:54
Hi Miikah,

I just stumbled across your youtube channel and found your really great emitting light example of dynamic paint...could you give a small explanation how you did that? Or even post the blend? Btw.: I really think that your documentation is very good - should be more often that developers point out, how there piece of code is intended to work! I realy appreciate your effort!

Thank you so much! Thomas
schuppekens
Feb-26-2011 17:10
StarStarStarStarStar
They really need to implement this in the official blender.
lightbulb
Mar-21-2011 22:28
wow this is so amazing. wish i had known about this a long time ago. they should include this with the next release of blender.
AlexDS
Jul-16-2011 18:32
Awesomeness!!!
Patricia
Aug-01-2011 03:29
StarStarStarStarStar
Great Work. Thanks for sharing
MiikaH
Aug-06-2011 14:30
@Pep

Oh, that's a bug on latest version. Thanks for letting me know, I'll fix it right away!
Pep
Aug-07-2011 04:28
With release 39115 it works again!
Thanks for your impressive work :)
srujan
Aug-08-2011 10:25
Hi miikaH..dynamic painting is amazing. I'm more into vfx. its very useful for that purpose. I tried to replicate one of your demo videos; that is selecting material object option for the paint mesh. Then i applied blender logo image as texture to it. when i baked it and rendered blender logo image texture didn't show up. only defalut material colour rendered. could be generous to tell me what went wrong?
coolduck
Nov-19-2011 06:33
Hey miikaH,
Great stuff.

I could not get the wetmap to work. When I bake the wetmap to a PNG all the images are black.

I'm running 2.60.4 ver 41975.

Thanks!
Niko
Nov-19-2011 21:19
StarStarStarStarDark Star
Hello,
you explained the options very good and have nice examples, but i miss a general step-by-step tutorial on how to set up everything. It's not easy for a beginner like me to get it working.
Frascao
Nov-29-2011 20:14
[please pardon my english] Great site and tutorial...synthetic and completed both! You're so crazy!
I'm trying smoke painting but i have not understand what do you say for "To paint with smoke, you just have to use the smoke domain as a paint object. Just remember that domain has to have a renderable volumetric material."
Could you explain, please?
CIAO
Stefano
grenzfrequence
Dec-01-2011 09:54
Hi,

why did you close the sample blend files? I actual like to see them. Is there a way?

greatings, Stephan.
oneshotal
Jan-14-2012 17:17
StarStarStarStarStar
just getting around to checking out dynamic paint and it is AWESOME!
Modelangelo
Mar-05-2012 08:56
Hi,
Since Bmesh merge(44245) DP generates a black canvas, no matter what color material is set. Is that a known bug ?
darthninja18
Aug-14-2012 01:29
quick question I'm wanting to make like a snow effect. As the particles fall they build upon the canvas basically the opposite of what displacement works. Is there a way to raise instead of lower. By the way awesome guide thanks i'm excited to start using this more in a short film
lukas
Oct-27-2012 17:02
I checked "use object material" in brush menu and i have sphere with red material (set both in diffuse and in clouds map texture color) but after baking canvas i get blue color shape in rendered image sequence (same color as set in "paint color" box before checking "use object material"). Canvas and sphere UV mapped, blender internal render set, textures added to canvas and sphere so what i need to do to get red paint (object material) on canvas baked images?
anna
Apr-10-2013 11:52
This is best article about dynamic paint in web. So bad that the samples are not downloadable anymore. I have one question: how can I render wetmap in black&white output as in your sample above? I would like to use it in cycles to make some parts of the paint overlayed with another renderings. so i need to extract the transparency from the white parts. Thank you for the help!
toni
May-21-2013 17:18
Hi! How do I use object material as brush when rendering using cycles? Seems as if that option is not actually available for cycles.
Gabriel
Jun-15-2013 22:24
2013
Nice Documentation.
Blender 2.67 I had difficulty animating
Displacement Depth
John
Jul-09-2013 21:22
StarStarDark StarDark StarDark Star
You obviously know what you're doing, but some of us don't. You should have titled this a demo, not a guide, because you don't really show us the complete process. Thanks anyway for the effort.
Malick
Feb-12-2014 07:46
I am a newbie and using Blender 2.69. When I went to your tutorial on Dynamic Paint Basics as you suggested and selected bake from the dynamic paint cache, it wasn't selectable. Is there something else I am missing?
Sincerely,
Ary Darma
Dec-09-2014 16:53
StarStarStarStarDark Star
nice. thanks for your tutorial. this guide very useful for me.

Write a comment:
Name: *
Site:
Language:
Review:
Verification Code: *verification image (?)
Message: *
By: Miika HämäläinenLast update: Nov-07-2014 14:18MiikaHweb | 2003-2021